Removing decals (Mike Hundahl)
Cool shelve (Mike Hundahl)
Fixing color (Mike Hundahl)
Transparent colors (Skip Perrine)
Cable ties (Frank Kokosza)
Plug wires (Frank Kokosza)
Coils and bumper cam (Frank Kokosza)
Crush panels (Frank Kokosza)
Jacksrew deatils (Frank Kokosza)
Chassis's for Vintage StockCars (James Steiner)
Power steering reservoir (Frank
Kokosza)
Blowers (Frank Kokosza)
Shocks (Nicholas Henson)
Roof Flaps (Nicholas Henson)
How to do a kit review (Skip Perrine)
Doors (Blair Kelly)
Rear axel repair (James Steiner)
How to lower spindels - my version (Mike Hundahl)
![]()
Removing decals:
I was working on this last night and thought i would share a tip! 
You know when you are so into the model you are working on, and get interupted a few times and you lose track to what you was working on,well it happened i was in a rush and having the time of my life I put the wrong decal on the passenger side :)
What's worst is i looked at twice and didn't even noticed! ........LoL
So I sat here how am i gona get the decal off after it had dryed?
I was reading the directions to a bottle of " MICROSCALE-MICROSET"
(Ya i know who read's direction's ......LOL :)
But at the bottom it said it can remove decals too....YAAAHOOOOOO
After three heavy coats the decal came off,used my #11 blade and very carefully
went under the decal after it had loosened up and BINGO it came off and on went
the right one!!
![]()
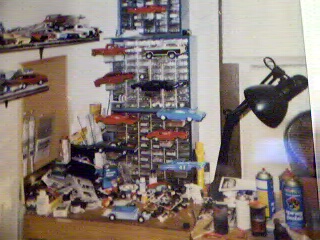 Cool
Shelve: Yup i know the feeling space is always needed. Here's
my version just took the pic.. I am using the parts bin's that house all of the
needed parts I am after but when I'm not looking thru the drawer's ,and after
the fresh paint has had 12 hour's( after spending the night in a cooler) to some
what dry I put them on the drawer till they are dry then polish them up.
Cool
Shelve: Yup i know the feeling space is always needed. Here's
my version just took the pic.. I am using the parts bin's that house all of the
needed parts I am after but when I'm not looking thru the drawer's ,and after
the fresh paint has had 12 hour's( after spending the night in a cooler) to some
what dry I put them on the drawer till they are dry then polish them up.
![]()
Fixing color:
While working on my list project car, i was polishing it up when i ran into a
snag, the polishing towel had gone thru the paint :(
i did a fix using a black sharpie marker, now you cant tell i went thru it...
hope this help's as i am sure the other color's like red will work great too
Transparent colors: I found that if you take a transparent color, (red, blue, green or pearl) and spray it over a dark color, you could make some interesting colors. For instance, trans red over black will give you a nice black-cherry, trans blue over a green will give a nice teal, pearl clear glosscoat over an aircraft gray will give you an interesting pearl sandstone, tran red over blue gives a dark purple, trans blue over black gives anice mid-night bllue. These are just a few ideas if your airbrush ever goes out on you, just remember you are not completely out of commission. Transparent colors are fun, try them sometime.
![]()
Cable ties:
This is an easy tip, and it'll give everyone something else to put those
fantastic looking cable ties on.
The rest of the NASCAR NUTS will have to clear this up for me: the seamless
cold-rolled steel tubing that roll cages are made of: is it 1 3/4" dia. or
is it 2" dia.? If it's 1 3/4", that would translate to 0.073"
diameter, and I can't find a manufacturer that makes rod or tubing that size. If
it's 2", however, the Evergreen .080" rod plus a couple of coats of
paint will come pretty close to the 0.083" that 2 inches would be in 1/24
scale. Also, the 0.080" rod is exactly the same size as the Revell (I keep
wanting to write "Monogram") roll cage bars. The Evergreen rod is
really workable, and I've even scratchbuilt two roll cages with it.
For padding where the pad on the roll cage goes only half way around the bar,
slice some Evergreen 1/8" tube down the middle, cut it to the correct
length, then use a round file to enlarge the hole (trough) in the middle. Use a
triangular file to carve shallow grooves in the outside of the pad so that it
appears to be squashed by the cable ties you'll add later. Paint the pad
semi-gloss black tinted with a drop or two of white or light grey to give it a
more rubbery look.
![]()
Plug wires:
Over the last three or four years, I've seen plug wires on Fords popping up
with extra insulation on them. Because of the way the wires are normally routed
on GM engines, I've not seen this done on them, but don't discount the
possibility. The plug wires have that brownish-orange hose from the plug boot
about halfway up the wire, ending about six inches over the valve cover. The
distributor end of the wire has a 90 degree boot, and there's another boot where
the insulation joins the portion of the wire that doesn't have extra insulation.
Use a #67 (.032") bit to drill the heads all the way through the block (the
insulated hose is .030"). Cut a 1 1/2" length of Detail Master DM 1441
Coolant Hose 3/4" Red and pull out all of the wire. Cut 3" lengths of
red Race Car Ignition Wire - 1/24 - .016 DIA and strip 1 1/2" of these
wires. Push the uninsulated wire into the coolant hose. To make boots, strip
some black insulation off #22 AWG wire, cut it into .050" (precision not
required) sections, stretch a section over a pencil tip, then quickly place it
over the junction between the coolant hose and the red wire. Secure in place if
needed with CA. When putting these wires on the heads, align them so that about
1/4" of the insulation is over the top of the valve cover (which is why I
drill all the way through the block). Make all length adjustments on the
distributor end of the wire.
The most outstanding feature of this tip is that the wires are different-looking
and more colorful, yet accurate for many cars.
![]()
Here are a couple of ultra-easy
details that'll spruce up the shadows of your interiors and your exteriors,
too.
1.) Coils. Everybody does ignition
boxes, but you never see coils. Why? They're hidden away, usually in the shadows
under the dash, close to the firewall. If you look closely, you'll sometimes see
them standing straight up on top of the transmission tunnel. Cut a pair of
cylinders .2" long from scrap .060" rod. Drill a hole sized to fit
your spark plug wire right in the middle of the "top" of the coil.
Glue in about 1/2" of wire, and add a short section of scrap insulation for
a boot. Paint the coils flat black, add a pair of Bare Metal stripes around both
of them, glue both coils to an aluminum painted 1/4" X 1/4" scrap of
.020" sheet, and stick the whole mess where one will barely be able to see
them. They're there, and folks will imagine there's a lot more detail than there
really is. Note: On some cars, the coils are readily visible as they're bolted
to the right leg extension on the seat. You'll have to be more careful with
those.
2.) Bumper cam. We see a lot of
pictures from the bumper cam, but have you ever seen a bumper cam? The guts of
the bumper cam is a black rectangular box about 1 1/2 thick, maybe 6 inches
long, and 3 or 4 inches wide. The part you can see however, can easily be
replicated by hacking a .1" section of .080" half round, painting it
aluminum, then adding a black strip decal across its midsection. Add to the
bottom of this a .010" or .020" semicircle of sheet plastic cut with a
sharpened 1/4" dia. brass tube, and you have the little advertising plate
at the bottom. Hardly anyone has seen a bumper cam, but EVERYONE notices when
it's there. Where does it go? Not on the bumper or the left side of the car,
because it can be hit or have gas spilled on it. Locate the bumper cam somewhere
on the sheetmetal over the bumper, to the right side of the car. If you see
rectangular holes on the rear sheetmetal of cars, that's where the bumper cam
goes for the race.
![]()
Crush panels:
Crush panels on model cars have two purposes. They're there on the real cars,
for one thing. More importantly, they hide all that area behind the firewall
that would be wide open without them. Word of warning: if you like removable
bodies, the crush panels will interfere a bit.
After completing the chassis and firewall, slide a rectangle of .020" sheet
into the engine compartment, flush with the vertical portion of the firewall. On
Fords, there may be a ridge in the body which needs to be removed. Using a
sanding stick, shape the curves of the top of the crush panel. There's no real
science to this, and the whole process won't take more than 20 minutes. When
you're done, the crush panels will butt nicely against the sides of the body and
will overlap the firewall by about .020". Don't glue them onto the firewall
yet; wait until the car is together and add them on last. Detail the crush
panels with three strips of .020"X.020" stock, rounded at the ends
(really, radiused at the ends). Use plenty of liquid glue and let the crush
panels dry for 2 or 3 days. Sand the strips down to about .010", then sand
them some more with 0000 steel wool. The steel wool will round out the corners
on the strips and you'll end up with a crush panel which looks like it has
embossed stiffeners on it. With a pin, punch a straight line of holes down the
edge of the crush panel which will be riveted to the firewall. Cover the whole
assembly with Matte Bare Metal foil. Use a light wash of flat black to bring out
the "rivet" and stiffener detail. You're done!
![]()
Jackscrew
details: Most folks don't even think about it, but there are
jackscrews on both the front and rear springs of Winston Cup and Busch cars.
During races, we get to see teams adjusting the rear jackscrews (round o' wedge)
all the time, right? There are jackscrews on the front springs, too, but the
rules don't allow the
teams to adjust them during a race. To make front jackscrews, I use Walthers
BRASS MACHINE SCREW #00-90 1/4 Hex Head, available in hobby shops that sell
railroad supplies. Using a #61 bit, drill a hole in the middle of those
projections on either side of the frame rails (the ones between the
"arms" of the upper control arms). Please note that you might have to
sand the tops of the round projections down in order to get the drill to stay
put. Cut the hex head off of the machine screw, stick the cut end in the hole
you just drilled, and use needle-nose pliers to screw them in, if needed. The
screws don't have to be the same length, they're adjusters for the springs.
Paint the jackscrews flat black, then drybrush with aluminum to bring out the
thread detail. So there you have it, another small but noticable detail in your
engine compartment. On Monday, we'll talk about
adding a power steering fluid reservoir with all of its plumbing.
![]()
Chassis's for Vintage StockCars: If you are want to build a Vintage Car and you need a racing chassis and interior tub, and don't have one or if your not sure how to go about building one from scratch. Find yourself a amt Bobby Allison 1975 Matador Stocker. The chassis will work with just about any 1/25 scale car body with little or no mods at all. I have a mpc charger stocker body riding on one , and it looks awesome !! I did adjust the ride height, as it sat a little higher then I care for, but it isnt law if you are new to kitbashing, although it will look more like the real thing if it rides lower to the ground. The Matador chassis is nice but the cage is lacking a few door bars, but you can easily add some bars, made from tree stock or you can buy styrene round tubing in many different sizes. This chassis also works great for resin body cars. Just add engine and trany of choice and you are ready to race...lol. The wheels and tires from the matador kit will also work for most cars depending on the year of car you are building. So how about building a Vintage Nascar? They are a lot of fun and easy to build......I Love Them !!!!! So for what its worth...
![]()
Power steering reservoir: This is a relatively simple tip of the day, and there are a lot of ways to pull it off. Here's my favorite: Chuck about an inch of .100 or .125" Evergreen rod (these things vary in size) into a drill or dremel tool. Use a sanding stick to round the end of the rod. Drill out the rounded end of the rod. Once this is done, cut the rod to a length of about 1/4". Find an appropriate cap for the reservoir. Gas caps with finger grips work, as does the oil filler cap for the valve cover of the Revell miata. My favorite cap is an adjusting knob for a 1/35 scale TOW missile launcher available on DML's 82nd ABN kit. There are two such knobs in the kit, as well as some radios that work well as NASCAR radios when you cut off some of the little pockets. Just putting a round cap on top also works. Plant a knob on the top of the reservoir. Paint the whole assembly (all two parts) aluminum, then overcoat the knob with turn signal amber to give it a zinc-chromate look. After completion, the reservoir usually gets stuck to the front hoop, right in the "Y" where the smaller bar branches off to the middle of the firewall, on the left. For detail nuts, plumb the thing. Make a 120-degree fitting for the bottom of the reservoir (where you drilled your marker hole) out of Detail Master #3 fittings. Stick a #1 compression fitting about 2/3 of the way down the reservoir. Run a #3 braided cable to the center of the power steering pump from the bottom of the reservoir. There is a cluster of three bumps on the steering gearbox at the rear. The one at the rear should receive a short section of blue wire from the power steering pump. The next one up gets the #1 braid from the reservoir. Paint the gearbox aluminum, the overcoat it with turn signal amber except for the rectangular section in the middle. Also paint the Pittman arm the same fake zinc-chromate color. For real detail nuts, add some bolt heads to the opposite side of the frame rail from the steering gearbox. You should see four bumps on the gearbox right where it lays flat against the frame rail (two on top and two closer together on the bottom) which will guide your bolt head placement. Enjoy!
![]()
Blowers:
This tip is really an extension of the Bare Metal brake duct trick. Almost
everything that has one of those flex hoses also has a blower on it. Where there
are brake ducts, there are always blowers. Use a sanding stick to bevel the end
of an Evergreen 1/8" tube at about 45 degrees. Measure 1/4" from the
end of the tube and make a straight cut, yeilding a 1/4" long cylinder with
a straight end and a beveled end. Ream out the beveled end until a short section
of .080" rod fits in it. Glue a short section of the rod into the beveled
end to give something to which you can glue the flex hose. Paint the blower a
gloss or semi-gloss light bluish gray, such as light gull gray or aircraft gray.
If you use these blowers for front brake ducts, make an enclosure for the ducts
out of 1/4" (or larger) square or rectangular Evergreen stock (don't use
square tubes--it's only frustrating). Mount three blowers on the enclosure. If
you do this, be prepared for some very, very cramped quarters and tight fits.
Super detail nuts can add a single black wire to the middle of the blower (the
smaller the wire, the better). Terminate the wire in a hidden place so no one
can see the end (another illusion). Also, if any of your friends builds airplane
models, see if you can nab some decals from his 1/72 Hasegawa Aircraft Weapons I
set. The small black data decals look great (and correct) on the blowers.
Alternately, aftermarket train suppliers offer a wide variety of train data
decals, many of which will do the job nicely. Even just black rectangles work
well. Super-super detailers can add a .030" strip of .010" sheet
aluminum around the flex hose with CA. Then, add a .050" section of #22 AWG
wire (parrellel to the strip) where the two wire ends meet to represent that
screw that tightens the hose clamp down. Apply a very thin black wash under the
clamp to bring it to life.
![]()
Shocks:
Cut the shocks from the kit pieces leaving about .010" of the shock left on
the piece as well as the top mount. The piece needs to be mounted to the chassis
at this point. Once it's mounted (you can use a straight pin in place of the
shocks to keep the mounts angled properly), get some 3/32" OD aluminum
tubing, 1/16" OD aluminum (or brass) tubing, and either 1/32" brass
rod or nickel plated straight pins. Cut the large aluminum tubing to the length
of the kit supplied shocks. Cut the 1/16" tubing about .010" longer
than the
larger tubing. The inner one should be painted brass on the tip if it's
aluminum, but if it's brass, it should be polished. This makes the brass seal
ring. The head of the straight pin should be cut off and the needle point
inserted into the inside of the small tubing. At this point the only things that
should be glued are the two large
tubes. If you are using the brass rod, cut it to a length much larger than the
small piston portion of the kit shock, but no larger than the whole thing. After
this is finished, cut a piece of the 1/16" tubing about 1/32" wide.
This will create the lower end attachment. Cement it to the brass rod or nickel
pin. Now to install it, paint the top portion of the shock (what's left from on
the kit piece) brass and then attach the top of the aluminum tubing
so that the brass seal ring is on the bottom. Now glue the other end to wherever
it attaches on the chassis. You can put a grandt line bolt in the center of it
to simulate the bolt. Paint the washer on it black to represent the rubber boot.
For decals, just get the ones from Slixx and mount the full logo horizontally or
the wording vertically. If you really want to go nuts, print out some real tiny
car numbers and location abbreviations (RF, LF, etc) on paper and then glue it
on the shock. These are real small. Most teams use the location on their shocks
so they don't get them confused. Also, teams are required to put the car number
on them in case they get lost during the race. Most teams also use plain ole
paper printed with this info and then tape it onto the shock. I guess this is
cheaper and more easily to change than writing directly on it. I've also seen
shocks with brass and chrome piston which is why I said you could use a straight
pin or brass rod. This should add some character to your model! If you want even
more detail, get the tube that the 3/32" tube slides into and use about
3/16" of it at the top of the shock just below the top brass mount to
simulate the blister topped (not sure what the name of them are) shocks. It is
basically just a way to add more oil for dampening the shock.
![]()
Roof flaps:
Not many people add the bottom of the roof flaps. Pretty much it's just slab on
the decals or paint in the grooves and not bother touching the roof! The kits
look bare without detail so here's how to add the bottoms and have nice looking
roof flaps without the frustration of full detail. Here's what you'll need...
.020" coated wire (scale spark plug wire) I prefer gray for this
drill bit
.040" sheet plastic
Slixx roof decals
.010" sheet plastic or photoetched washers
First thing you need to do is measure the existing roof flaps. I'm not sure if
all are the same. I prefer to just use the slixx black lines. Anyway, once it's
measured, subtract about .040" from the width and length. With these new
measurements cut out a rectangle from the .040" sheet plastic. Round off
all the edges. It's best to go ahead and glue them in on the roof centered where
they are going to go. Make sure this is on the inside! Now you need to drill for
the hanging wire. Strip the coating off the wire and use it's diameter to
determine the drill bit you need. The exact placement of the hangers are
straight out from the hinges (the little pieces sticking out on the forward
side) and about one scale inch from the back which is .040". Just drill the
two holes. Once you've painted the chassis, insert the wire. The wire should be
roughly 3/8" long. Now for the washer. All you have to do is place a
photoetch washer on the wire and then place a small section of the insulation
back on
the wire for the bolt head on the end. If you don't have photoetched washers,
you can ream out the inside of an aluminum tube and stamp a sheet of .010"
sheet plastic to make washers. The wires just hang there, and they add a lot of
visualization to the interior. An interior looks almost naked without them.
You'll have to make sure
they don't interfere with the tops of the roll cage which is another reason I
like slixx's as you can "move" the flap. Hope ya'll like, and I
appreciate the comments on the last one.
![]()
How
to do a kit review:
1. Always put down the kit#, name of kit, manufacturer of kit, color molded in,
fit and finish, whatever it has flash or is a clean model. Tell about the
overall model, i.e. is it engraved extra nice? Tell about it!
2. Don't be afraid to give your own opinion about the kit, did you like it or
not? You are telling your fellow modellers about it, don't worry about making
"brownie points" with the manufacturers, 'cause if there's one thing I
have learned from doing kit reviews (for well over 15 years now), the
manufacturers want to know the truth about their products, so DO NOT sugar coat
your review. If the kit stinks! Tell it like it is.
3. I always give a brief history about my subject when I do a review, as you
will see from the example I did here at my e-mail. If it's a car, I try to find
as much about it as I can without boring my readers, reference material is a
must when you do a review.
4. If you have any pics of the model, it's always good to use them. Case in
point, John Petrie has some of the best pics of NASCAR stockers that I have ever
seen, I will be using the pics I have saved of his cars for future reviews and
even as I build some of the cars he has shown us, I hope you guys have been
taking advantage of his pics he has posted on here.
![]()
Doors:
I know that most NASCAR's doors don't open except for the real vintage ones, but
sometimes it's nice to be able to open the trunk to view chassis and fuel cell
detail on some of the more modern cars.
There are tons of ways to do this but here is a method that I think works very
well. And it's real simple to boot!
First, you've got to secure the car body in a vise of some sort so that it
doesn't move at all while you're working on it. A hobby vise will work, or if
you're carefull, you can hold it tightly between your knees.
Next, you'll need a length of polyester thread, about three feet. You also need
a pin vise and a real small drill bit. You may also find it helpfull to have a
small sewing spool to wrap the thread onto.
To begin, you drill a hole along one of the panel lines. Be sure to drill it in
a spot that is at a joint or corner. This will make it less noticeable if things
don't come out perfect. Use the smallest drill bit that you can. The hole just
has to be big enough to put the thread through.
Once the hole is drilled, thread the polyster thread through the hole. Wrap one
end around your finger and the other end (the longest end) around the spool. The
reason you do this is so that as you go along, you'll want to advance the thread
so that it stays fresh.
Now all you have to do is run the thread back and forth through the hole. Just
like you are using a flexible saw. The thread will heat the plastic and cut
though as you go. Just apply light pressure and you'll easily follow the panel
line.
With some practice, it's easy to cut along even the toughest shapes. The corners
and curves will be the smoothest you've ever seen. Once you've cut the whole
panel, remove the thread.
As you were cutting, the plastic was warm enough that the panel will be sort of
stuck in place. You'll have to apply some pressure to get it to snap out. The
cut will be pretty clean. Some light snading is all it will need. The resulting
panel will fit nice and tight because of this.
That's it! Hinge the panel and you're done. If you're doing a door, you can use
some sheet and strip styrene to build a door frame to make it look good when the
door is open.
![]()
Rear axel repair: surviers flag, You know , they are a heavy wire with a little red or yellow flag on the end. They can be found around construction sites as well ! I have used these flags for years !! But most newer kits dont have metal axels any more. If you are like me and like to have rolling models this is the way to go! You will also need to have a wheel that will accept a metal axel, This is an other easy fix. Take your wheel and find a scrap piece of plastic and superglue it in the hole on the back side of the wheel. After it is dry , take a small drill bit and you pin vice and drill a new hole and insert the metal axel. Or you can use the stubby plastic axel that you are replaceing to fill the hole in the wheel and , drill a new one. This will work for front axels as well.You may have to drill a hole in the engine block for the axel to pass to the other side. If you have any questions feel free to email me and Ill bet that my good friend MJ will be more than happy to help too !!!
![]()
Have you ever tried to get the down in the weeds look? Instead of building your model box stock heres a tip that i just got done doing on my 1967 CHEVY CHEVELLE BY REVELL
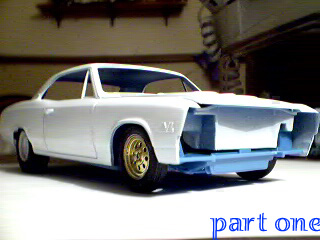 |
[ part one ] this how the finished project looks after i give it the spindle treatment.. |
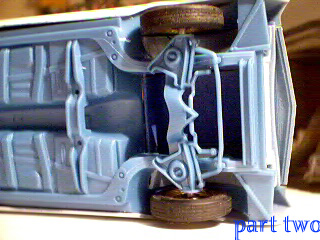 |
[ part two ] This is the bottom view to get a better idea on how it
works out,
[note] the wheels will slide in an out so you can fine tune it when you are ready to glue it in place. |
 |
[part three] These's
are the piece's that i used to make my spindle's; alum. tubbing of
the size of your choice; A metal axle; drill bit of the same size as metal
axle.
Using the cut off wheel on your dremel (if you have one, and remember safety first when using it) Cut off the old spindle stub, but leave the backing plate there as it will show on the bottom view if you cut it off, now relocate a new hole to drill for the metal axle. "but do not drill all the way thru the frame as it will make it weak"? then cut metal axle to the lenght that you will need, then cut the alum. tubbing ,"just cut it alittle shorter then the metal axle, this way you will be able to move it in or out to get it set right" [note] If you can see the alum. tubbing sticking out of wheel?just cut off a piece of the metal axle and angle grind it to give it a tapper, when done you will have a cool looking dust cap"or bearing cover over the front wheel bearing's" [another tip] This idea will work for the rim's that use the metal axles "just follow part three" then you will have to cut down the wheel stub to get in the right spot just don't cut to much as the tires will set inboard to much and not look right
|